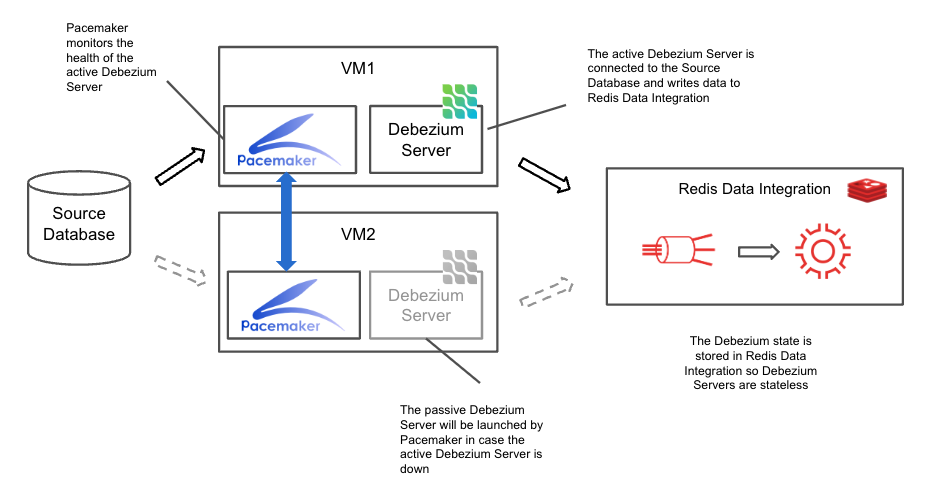
Deploy a Debezium Server VM cluster using Pacemaker
This document will guide you through the steps required to deploy a three-node, active/passive cluster of Debezium Server VMs using Pacemaker.
This guide covers:
- CentOS Linux 7
- CentOS Stream 8
- Red Hat Enterprise Linux (RHEL) 7 and 8
- Rocky Linux 8
- Ubuntu 18.04
- Ubuntu 20.04
For other Linux versions please check the Pacemaker documentation for the right binary packages and configurations.
Prerequisites
The following ports must be enabled for Pacemaker and Debezium Server:
| Protocol | Port | Description |
|---|---|---|
| TCP | 2224 | pcsd Web UI and node-to-node communication |
| UDP | 5404-5412 | Required on corosync nodes to facilitate communication between nodes |
| TCP | 8088 | Query Debezium Server status |
For further details about Pacemaker, see Enabling ports for the High Availability Add-On (Red Hat).
Installing and running Pacemaker
CentOS 7/RHEL 7
Repeat the following steps on each of the VMs that will run the Debezium Server:
Configure the repository in RHEL 7
Note: This step is not needed for CentOS 7
Pacemaker is only available through CentOS 7 repositories, so the first step is to configure a suitable repository:
sudo bash -c 'cat << EOF > /etc/yum.repos.d/centos.repo
[centos-7-base]
name=CentOS-7 - Base
mirrorlist=http://mirrorlist.centos.org/?release=7&arch=x86_64&repo=os
enabled=1
gpgkey=http://mirror.centos.org/centos/7/os/x86_64/RPM-GPG-KEY-CentOS-7
EOF'
Install Pacemaker and dependencies
sudo yum install -y pacemaker pcs resource-agents
Start the Pacemaker service
sudo systemctl start pcsd.service
sudo systemctl enable pcsd.service
Set a password for the cluster
Replace <PASSWORD> with a password of your choice.
sudo bash -c 'echo <PASSWORD> | passwd --stdin hacluster'
Run the Pacemaker cluster
Replace <PASSWORD> with the value from the previous step and <HOST1>, <HOST2>, and <HOST3> with the hostnames/IP addresses of the respective VMs forming the cluster.
sudo pcs cluster auth <HOST1> <HOST2> <HOST3> -u hacluster -p <PASSWORD>
sudo pcs cluster setup --force --name cluster_dbz <HOST1> <HOST2> <HOST3>
sudo pcs cluster start --all
sudo pcs property set stonith-enabled=false
See validating the installation to verify the cluster is running correctly.
CentOS Stream 8/RHEL 8/Rocky 8
Repeat the following steps on each of the VMs that will run the Debezium Server:
Configure the repository in RHEL 8/Rocky 8
Note: This step is not needed for CentOS Stream 8
Add the HA repository to your package manager to obtain Pacemaker binaries:
sudo dnf config-manager --set-enabled ha
Install Pacemaker and dependencies
sudo dnf -y install pcs pacemaker
Start the Pacemaker service
sudo systemctl start pcsd.service
sudo systemctl enable pcsd.service
Set a password for the cluster
Replace <PASSWORD> with a password of your choice.
sudo bash -c 'echo <PASSWORD> | passwd --stdin hacluster'
Run the Pacemaker cluster
Replace <PASSWORD> with the value from the previous step and <HOST1>, <HOST2>, and <HOST3> with the hostnames/IP addresses of the respective VMs forming the cluster.
sudo pcs host auth <HOST1> <HOST2> <HOST3>
sudo pcs cluster setup cluster_dbz <HOST1> <HOST2> <HOST3>
sudo pcs cluster start --all
sudo pcs property set stonith-enabled=false
See Validating the installation to verify the cluster is running correctly.
Ubuntu 18.04
Repeat the following steps on each of the VMs that will run the Debezium Server:
Install Pacemaker and dependencies
sudo apt update
sudo apt install -y pacemaker pcs
Start the Pacemaker service
sudo systemctl start pcsd.service
sudo systemctl enable pcsd.service
Set a password for the cluster
Replace <PASSWORD> with a password of your choice.
sudo bash -c 'echo "hacluster:<PASSWORD>" | chpasswd'
Run the Pacemaker cluster
Replace <PASSWORD> with the value from the previous step and <HOST1>, <HOST2>, and <HOST3> with the hostnames/IP addresses of the respective VMs forming the cluster.
sudo pcs cluster auth <HOST1> <HOST2> <HOST3> -u hacluster -p <PASSWORD>
sudo pcs cluster setup --force --name cluster_dbz <HOST1> <HOST2> <HOST3>
sudo pcs cluster start --all
sudo pcs property set stonith-enabled=false
See Validating the installation to verify the cluster is running correctly.
Ubuntu 20.04
Repeat the following steps on each of the VMs that will run the Debezium Server:
Install Pacemaker and dependencies
sudo apt update
sudo apt install -y pcs pacemaker
Start the Pacemaker service
sudo systemctl start pcsd.service
sudo systemctl enable pcsd.service
Set a Password for the cluster
Replace <PASSWORD> with a password of your choice.
sudo bash -c 'echo "hacluster:<PASSWORD>" | chpasswd'
Run the Pacemaker cluster
Replace <PASSWORD> with the value from the previous step and <HOST1>, <HOST2>, and <HOST3> with the hostnames/IP addresses of the respective VMs forming the cluster.
sudo pcs cluster destroy
sudo pcs host auth <HOST1> <HOST2> <HOST3>
sudo pcs cluster setup cluster_dbz <HOST1> <HOST2> <HOST3>
sudo pcs cluster start --all
sudo pcs property set stonith-enabled=false
See Validating the installation to verify the cluster is running correctly.
Validating the installation
Check the status of the cluster:
sudo pcs status cluster
For a correctly configured cluster, this will result in output similar to the following:
Cluster Status:
 Stack: corosync
 Current DC: gvb-deb7-1 (version 1.1.23-1.el7-9acf116022) - partition WITHOUT quorum
 Last updated: Thu Dec 29 14:11:26 2022
 Last change: Thu Dec 29 14:11:22 2022 by hacluster via crmd on gvb-deb7-1
 3 nodes configured
 0 resource instances configured

PCSD Status:
  gvb-deb7-3: Online
  gvb-deb7-2: Online
  gvb-deb7-1: Online
Set up Pacemaker to launch and control Debezium Server
The VM cluster is now ready to run Debezium Servers.
There are two methods for launching Debezium Server with Pacemaker:
- Run Debezium Server as a container using the Heartbeat resource agent for Podman or Docker
- Run Debezium Server as a standalone Java process using the systemd resource agent
Run Debezium Server as a container
Repeat the following steps on each of the Pacemaker cluster nodes.
Provide the Debezium configuration file
Debezium Server expects to find file application.properties in a specified directory. Use the file created through command redis-di scaffold (edited for your source database) and upload it to the home directory of each VM:
mkdir conf
mv application.properties conf
Create the Pacemaker resource for the Debezium container
This guide uses Podman to illustrate the required commands. If you are using the Docker resource agent, simply replace
podmanwithdockerbelow.
The Podman resource agent is not available for CentOS 7/RHEL 7/Ubuntu 18.04. Use the Docker resource agent instead.
To launch the Debezium Server container use the podman service of Pacemaker (Podman needs to be installed as a prerequisite):
sudo pcs resource create dbz_server ocf:heartbeat:podman image=docker.io/debezium/server allow_pull=yes reuse=yes run_opts="-v $PWD/conf:/debezium/conf"
If you are using the Docker resource agent, you should also specify some logging options:
sudo pcs resource create dbz_server ocf:heartbeat:docker image=docker.io/debezium/server allow_pull=yes reuse=yes run_opts="-v $PWD/conf:/debezium/conf --log-driver local --log-opt max-size=100m --log-opt max-file=4 --log-opt mode=non-blocking"
You can find details for all available logging options in the Docker documentation.
Take note of the
run_optsparameter, which allows you to pass various options to the Debezium Server container. One key option is the mapping of theapplication.propertiesconfiguration file. For more details on additional options you might need to specify, see the Containerized Deployment section.
Oracle
If you are using Oracle as your source database, note that Debezium Server does not include the Oracle JDBC driver. As a result, it will fail with an error. You should follow these steps to add the JDBC driver:
Download the driver:
wget -P oracle https://repo1.maven.org/maven2/com/oracle/database/jdbc/ojdbc8/21.1.0.0/ojdbc8-21.1.0.0.jarAdjust the
pcs resource creationcommand:sudo pcs resource create dbz_server ocf:heartbeat:podman image=docker.io/debezium/server allow_pull=yes reuse=yes run_opts="-v $PWD/conf:/debezium/conf -v $PWD/oracle/ojdbc8-21.1.0.0.jar:/debezium/lib/ojdbc8-21.1.0.0.jar"
Verify status
sudo pcs status
This should result in output similar to the following:
Cluster name: cluster_dbz
Stack: corosync
Current DC: gvb-deb7-1 (version 1.1.23-1.el7-9acf116022) - partition with quorum
Last updated: Thu Dec  8 16:02:53 2022
Last change: Thu Dec  8 16:02:48 2022 by root via cibadmin on gvb-deb7-1

3 nodes configured
1 resource instance configured

Online: [ gvb-deb7-1 gvb-deb7-2 gvb-deb7-3 ]

Full list of resources:

 dbz_server	(ocf::heartbeat:podman):	Started gvb-deb7-1

Daemon Status:
  corosync: active/disabled
  pacemaker: active/disabled
  pcsd: active/enabled
Troubleshooting
Verify the container is running with sudo podman ps -a. This should result in output similar to the following:
CONTAINER ID   IMAGE             COMMAND              CREATED          STATUS          PORTS     NAMES
2aecd4e9fa31   debezium/server   "/debezium/run.sh"   2 minutes ago    Up 2 minutes              dbz_server
If the Debezium Server fails to start or doesn’t behave as expected, you can check the log file:
sudo podman logs dbz_server
A healthy log file ends like this:
2022-12-08 16:02:57,284 INFO  [io.deb.con.mys.MySqlStreamingChangeEventSource] (blc-gvb-mysql:3306) Connected to MySQL binlog at gvb-mysql:3306, starting at MySqlOffsetContext [sourceInfoSchema=Schema{io.debezium.connector.mysql.Source:STRUCT}, sourceInfo=SourceInfo [currentGtid=null, currentBinlogFilename=mysql-bin.000006, currentBinlogPosition=154, currentRowNumber=0, serverId=0, sourceTime=null, threadId=-1, currentQuery=null, tableIds=[], databaseName=null], snapshotCompleted=false, transactionContext=TransactionContext [currentTransactionId=null, perTableEventCount={}, totalEventCount=0], restartGtidSet=null, currentGtidSet=null, restartBinlogFilename=mysql-bin.000006, restartBinlogPosition=154, restartRowsToSkip=0, restartEventsToSkip=0, currentEventLengthInBytes=0, inTransaction=false, transactionId=null, incrementalSnapshotContext =IncrementalSnapshotContext [windowOpened=false, chunkEndPosition=null, dataCollectionsToSnapshot=[], lastEventKeySent=null, maximumKey=null]]
2022-12-08 16:02:57,285 INFO  [io.deb.uti.Threads] (blc-gvb-mysql:3306) Creating thread debezium-mysqlconnector-chinook-binlog-client
2022-12-08 16:02:57,285 INFO  [io.deb.con.mys.MySqlStreamingChangeEventSource] (debezium-mysqlconnector-chinook-change-event-source-coordinator) Waiting for keepalive thread to start
2022-12-08 16:02:57,390 INFO  [io.deb.con.mys.MySqlStreamingChangeEventSource] (debezium-mysqlconnector-chinook-change-event-source-coordinator) Keepalive thread is running
Testing
The following tests can be performed to verify the expected behavior:
Kill the container:
sudo podman rm -f dbz_serverPacemaker will restart the container. You can verify with:
sudo pcs statusKill the VM:
Pacemaker will start the Debezium container on the standby node. You can verify with:
sudo pcs status
Running Debezium Server as a standalone Java process
Debezium Server is a Java application, so Java 17 (OpenJDK 17) must be installed as a prerequisite.
Repeat the following steps on each of the Pacemaker cluster nodes.
Download and install Debezium Server
wget https://repo1.maven.org/maven2/io/debezium/debezium-server-dist/2.3.0.Final.Final/debezium-server-dist-2.3.0.Final.Final.tar.gz
sudo tar xvfz debezium-server-dist-2.3.0.Final.Final.tar.gz -C /opt
This will install Debezium Server in the directory /opt/debezium-server.
Provide the Debezium configuration file
Debezium expects to find the application.properties file in a specific directory. Use the file created through command redis-di scaffold (edited for your source database) and upload it to the home directory of each VM, then move it to the Debezium Server conf directory:
sudo mv application.properties /opt/debezium-server/conf
Create a systemd unit file for Debezium Server
- Create a
debezium.servicefile with the following content:
[Unit]
Description=systemd service unit file for Debezium Server

[Service]
ExecStart=/bin/bash -c 'cd /opt/debezium-server && ./run.sh'
- Copy to
/usr/lib/systemd/system:
sudo cp debezium.service /usr/lib/systemd/system
Note: For Ubuntu, the target directory is
/lib/systemd/system.
- Reload the systemd daemon:
sudo systemctl daemon-reload
Important: make sure that the Debezium systemd service to be controlled by the cluster is not enabled to start at boot time.
Oracle
If you are using Oracle as your source database, note that Debezium Server does not include the Oracle JDBC driver. As a result, it will fail with an error. You should download the JDBC driver to /opt/debezium-server/lib before creating the Pacemaker resource:
sudo wget -O /opt/debezium-server/lib/ojdbc10-19.17.0.0.jar \
https://repo1.maven.org/maven2/com/oracle/database/jdbc/ojdbc10/19.17.0.0/ojdbc10-19.17.0.0.jar
Set up Pacemaker to launch and control Debezium
To launch Debezium Server use the systemd resource agent of Pacemaker:
sudo pcs resource create dbz_server systemd:debezium
Verify status
sudo pcs status
This should result in output similar to the following:
Cluster name: cluster_dbz
Status of pacemakerd: 'Pacemaker is running' (last updated 2022-12-09 12:21:55Z)
Cluster Summary:
  * Stack: corosync
  * Current DC: gvb-deb3 (version 2.1.5-2.el8-631339ca5aa) - partition with quorum
  * Last updated: Fri Dec  9 12:21:55 2022
  * Last change:  Fri Dec  9 12:10:24 2022 by root via cibadmin on gvb-deb1
  * 3 nodes configured
  * 1 resource instance configured

Node List:
  * Online: [ gvb-deb1 gvb-deb2 gvb-deb3 ]

Full List of Resources:
  * dbz_server	(systemd:debezium):	 Started gvb-deb1

Daemon Status:
  corosync: active/disabled
  pacemaker: active/disabled
  pcsd: active/enabled
Troubleshooting
If the Debezium Server fails to start or doesn’t behave as expected, you can check the status with systemctl:
sudo systemctl status debezium
A healthy status looks like this:
● debezium.service - Cluster Controlled debezium
   Loaded: loaded (/usr/lib/systemd/system/debezium.service; static; vendor preset: disabled)
  Drop-In: /run/systemd/system/debezium.service.d
           └─50-pacemaker.conf
   Active: active (running) since Fri 2022-12-09 12:10:24 UTC; 12min ago
 Main PID: 64740 (java)
    Tasks: 23 (limit: 22203)
   Memory: 179.6M
   CGroup: /system.slice/debezium.service
           └─64740 java -cp 2.3.0.Final-runner.jar:conf:lib/* io.debezium.server.Main

…
2022-12-08 16:02:57,285 INFO  [io.deb.uti.Threads] (blc-gvb-mysql:3306) Creating thread debezium-mysqlconnector-chinook-binlog-client
2022-12-08 16:02:57,285 INFO  [io.deb.con.mys.MySqlStreamingChangeEventSource] (debezium-mysqlconnector-chinook-change-event-source-coordinator) Waiting for keepalive thread to start
2022-12-08 16:02:57,390 INFO  [io.deb.con.mys.MySqlStreamingChangeEventSource] (debezium-mysqlconnector-chinook-change-event-source-coordinator) Keepalive thread is running
Testing
The following tests can be manually performed to verify the expected behavior.
Kill the Debezium Server process:
ps -elf | grep debeziumThis will show the running Debezium Server, for example:
root 19297 1 79 14:50 ? 00:00:08 java -cp debezium-server-dist-2.0.1.Final-runner.jar:conf:lib/* io.debezium.server.MainKill the process - in this example:
sudo kill 19297Pacemaker will restart the service. You can verify with:
sudo pcs statusKill the VM:
Pacemaker will start Debezium Server on the standby node. You can verify with:
sudo pcs status